This was our mantle.
It was basically an unfinished slab of wood over our fireplace. It was ugly and I wanted to fix it. So, this past weekend, J and I went to Home Depot to see what we might be able to do about it. We came home with a large board and some trim pieces that I thought would look good. But the trim wasn't quite wide enough to cover the wood plank, which I had no intention of removing. So, off I went back to Home Depot. I ended up finding another trim piece that could be attached to the trim pieces I had already bought to make the trim the size I needed. Oh, except I had to make another trip back to Home Depot with J the next day because the saws in the store were so bad I couldn't cut through the piece I needed. Actually, at one point, this guy who was watching me struggling unsuccessfully asked if he could help by holding the end of the wood piece. I told him that the stability of the piece was really not causing me difficulty. And he replied, "Sorry, I'm not mechanically inclined." Who says that? And why offer to help if you aren't actually going to help? And why are you in Home Depot if you aren't "mechanically inclined"? Anyway.... back to the project.
First, I took care of my big plank of wood. It was a few inches longer than I needed, so I used my (new!) square edge to make a line.
And went outside to make my cut. Now, I don't have any sort of fancy electric saw, so all of my cuts were using hand saws. Needless to say, I ended up being really sore by Monday.
After I made my cut, I sanded the board down, first with a medium sand sponge and followed with 220 grit fine sanding paper to make the wood nice and smooth.
I then primed my board. This primer was recommended by one of my favorite blogs, and I rather liked using it too.
While that was drying, I started making my cuts for the trim. I picked up this box (miter box) from Home Depot. It isn't as awesome as a miter saw, but it was affordable. I used a Japanese pull saw to make the miter cuts. And it really did work decently well despite being a lot of work.
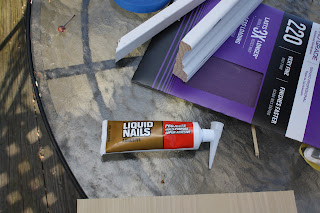
After making all of my trim cuts and making sure everything would align, I used liquid nails to glue the two pieces of trim together.
After applying the liquid nails, I taped the pieces together until they were cured (24 hours).
Back to my board. After everything was dry, I drilled holes into the board and existing mantle and screwed the board to the mantle. I used wood screws and made sure to recess them into the board.
I covered my screws with a little wood putty.
Meanwhile, my trim pieces had cured and were ready to be assembled. I don't have pictures, but I basically nailed the long piece in first and the two smaller pieces in after. And I used a nail set to recess the nails.
The trim pieces were not perfectly aligned so I did some adjusting with wood putty to make the seams meet up.
In some places, a lot of wood putty.
Once the wood putty was dried and sanded and smooth, I painted. I used Sherwin Williams cabinet and trim paint in Snowbound. Here she is after one coat. I plan on finishing it up with a few more coats of paint. I will then have to let it set for a week or so before I put anything up there. I am thinking of painting the bricks white to match as well. I think that would look better. But the mantle is looking sooo much better.
In other news, I also scooped up these kitchen rugs from Joss and Main (Vera Bradley rugs at a crazy discount). I love them for the kitchen and they match our existing blue accents!
I'll keep sharing more photos as I wrap up this project!


No comments:
Post a Comment