I have been meaning to refinish the top of the coffee table for a while now. But I finally took the plunge and did it. I used the tutorial I found on young house love for starting guidelines. But here is what we started with:
The coffe table was a gift from J's aunt when they had moved. Unfortunately, the top had some scratches that I am afraid we only added to or enhanced over the past two years. So, it was looking a little worse for the wear. The unfortunate part is that we were losing the stencils on the top of it. I started off by thinking that I could sand it down by hand. But after working on that for a while, I wasn't getting very far.
So, I broke down and opted for power tools. I bought an electric sander with a filter capability. Regardless, I still went for some safety equipment.
And then sanded away. I started with 100 grit paper for the electric sander and then switched to 220 grit to finish everything off. A midway through pic:
And once everything was sanded down:
I used Minwax PolyShades brand in Natural Cherry. The nice thing about the Polyshades is that it is stain and polyurethane in one so there would be less total coats. So, I went ahead and applied a thin first coat.
Now, an important thing when completing any home improvement project is to read directions. I read them but then got impatient. The directions say to wait at least 6 hours before applying a second coat. I waited 3 to see how it would go. This was a bad call.
And yes, that is a handprint on the table. I was pretty upset with myself (and J teased me about this afterwards - commenting on my lack of patience). Lesson learned. So, I had to wait for this to dry and then re-sand it all the way down and start over. I did much better this next time, following the directions and allowing ample time for drying between coats (about 24 hours).
These pictures are after the first coat (2nd time):
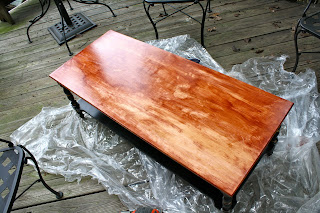
I then waited and sanded the table with 220 grit (this time lightly by hand) and painted another coat. I decided to finish it off with one more coat for good measure, so this process was repeated again. The can said 2 coats were sufficient, but I wanted to make sure to make a nice strong layer on the table top. Here are the results after 3 coats:
Yay! I am excited with the result - much less dinged up on the top. Now, to keep it looking nice by always using coasters and such. I am waiting to put everything back on the table until I know everything is good and set. I think there are a few parts where I see some imperfections in the staining, but I feel like I learned a lot from this process and could do it better in the future, especially in terms of making coats very thin and even. I also learned that you should always have a solvent on hand. The brush needed to be soaked in mineral spirits which were not immediately available and I still have residue on the brush.
In fun news this weekend, I made these pumpkin spice muffins from the girl who ate everything blog. They were really good and tasted like pumpkin bread. I opted not to do the cream cheese frosting since J doesn't like frosting and I actually really appreciated them for just their muffin-goodness.
I also went to the Solar Decathlon in DC this weekend with a friend and thought I would share a picture. The weather was pretty miserable, but it was fun to see all the green houses. This is the NZ house. Fun stuff.
We also saw the movie, 50/50 this weekend with some friends of ours, which was super sad but also really good. Hope you all had a great weekend!


Love it! I am continually impressed by all your projects...I don't think I would've had the perseverance to finish the table, ha!
ReplyDelete