Saturday, January 11, 2014

Basement cabinet hanging

I looked back and I guess this is my first post in the New Year! So Happy 2014! Our Christmas decorations are almost taken down and put away. I finally unplugged the outdoor lights today. I guess I realized that we were the only ones in the neighborhood with them still on (we're slacking).

We have some exciting news on the basement! The cabinets are finally up. There's still a few more things to do, but all pretty minor that I think we can handle. Before we get to the cabinets, let's backup a few steps. Last time, we were here (see picture below). The walls were finally in decent shape from the removal of the header. On and I painted! I painted way back on the first week of December. You can't 100% tell in these pictures, but I chose an off-white (A la mode by Benjamin Moore). I also painted the ceiling white.


I then removed the light fixture since the cabinets would need to be installed where the light was (you can see the off-white color in this photo). J and his dad removed the electrical box. The breaker to this circuit is still off because I need to do a little rearranging on the electrical, but I will probably cover that in a future post. For now, know that the electrical box was removed. From here on, I contributed 0% of the effort. I have been a little run down recently, and J and his dad did the cabinet work. I am super grateful for the help. This might not have happened without my father in law. So, if you are reading, a huge thank you!

On the first weekend he came down, they hung the top 3 cabinets. I asked J to take intermediate pictures, but he didn't, so we only have the finished product. However, they used a ledger board screwed into the wall and a support using a ladder and some wood boards to support the front of the cabinets to get everything screwed in straight. He did a really great job.


J's dad had to cut down one of the spacer pieces in order to get them to fit on the sides of the three cabinets. He came back today and put those in, which finished up the top cabinets!

He then worked on the bottom cabinets. I wasn't downstairs very much, but I know there was some cutting for the plumbing in the sink base. He used shims to correct for the unevenness in the tile.

Since the breaker is still off (I'll take care of that soon), we ran an extension cord for the fridge for now. Oh yea, isn't the new fridge super pretty? :) We may raise it up a little so it doesn't sit down from the cabinets.

Progress! I love it! The cabinets are super pretty and match the pool table almost exactly. My father-in-law installed them so perfectly in the space. I actually can't imagine doing this without him.

It gives me hope that this basement project might actually get done. Here's a rundown of what it will take to finish it up:
1. Re-install an electrical box for the switched light. Find a good lighting solution for the space. I have some ideas for this.
2. Install the crown molding on top of the top cabinets
3. Install the toe-kick
4. Decide whether to raise the fridge (and do so).
5. Fix the floor molding.
6. Get the countertop in.
7. Finish up the plumbing
8. Install knobs on cabinets

Most of those are relatively minor, so I am feeling pretty good about knocking this stuff out. I am pretty excited to see this project come together, especially after working on it since October(?).

Thanks for sticking with me!

Tuesday, December 31, 2013

Update

So, I realize this blog has been getting a bit of neglect recently. I'm sincerely very sorry about that. This last month has been absolutely bananas, and I have been feeling under the weather for the past 2 weeks, and it just hasn't happened. However, I am pleased to inform you that the cabinets did arrive and are sitting in our basement. I realized after they got here that I don't exactly have enough upper body strength to handle the install on my own (or with J), so we are going to have J's dad come down and help us out. Bonus: he's actually installed cabinets before. The cabinets do look really beautiful, so I am looking forward to having them in.

I do want to wish all of my readers a very Happy New Year (and a Merry Christmas for that matter). I am hoping to be a bit more motivated in the coming year and get this basement project completed, so we can move on to other fun things.

Sunday, December 1, 2013

Sugar Plumbing Fairy

Hello readers and Happy (belated) Thanksgiving! J and I spent turkey day with my parents and J's parents and had a very nice time. No major hiccups in the kitchen, either. This was the 3rd Thanksgiving we've hosted, so I feel like we are getting the hang of things. Besides the big event, my dad and I were able to tackle a project for the basement reno. And one of my friends, my mom, and I saw the Nutcracker (which was amazing) -- hence the name of this post.

While I was working on the drywall, I happened to be around the backside of the bar nook and noticed something strange. The drain pipe for the bar sink had become disconnected. For the record, I am very happy I stumbled on this prior to installing everything and turning on the water. The nook is on the top-right of this picture.

And here's another angle. Now pipes do not usually separate like this. In fact, it is pretty rare. This is the result of some poor plumbing work to begin with. We seem to be in the business of fixing mistakes from the previous owners. The worst part is that they knew this was a problem because of the caulk. They attempted to use caulk to fix this. Instead, this pushed the problem to us.

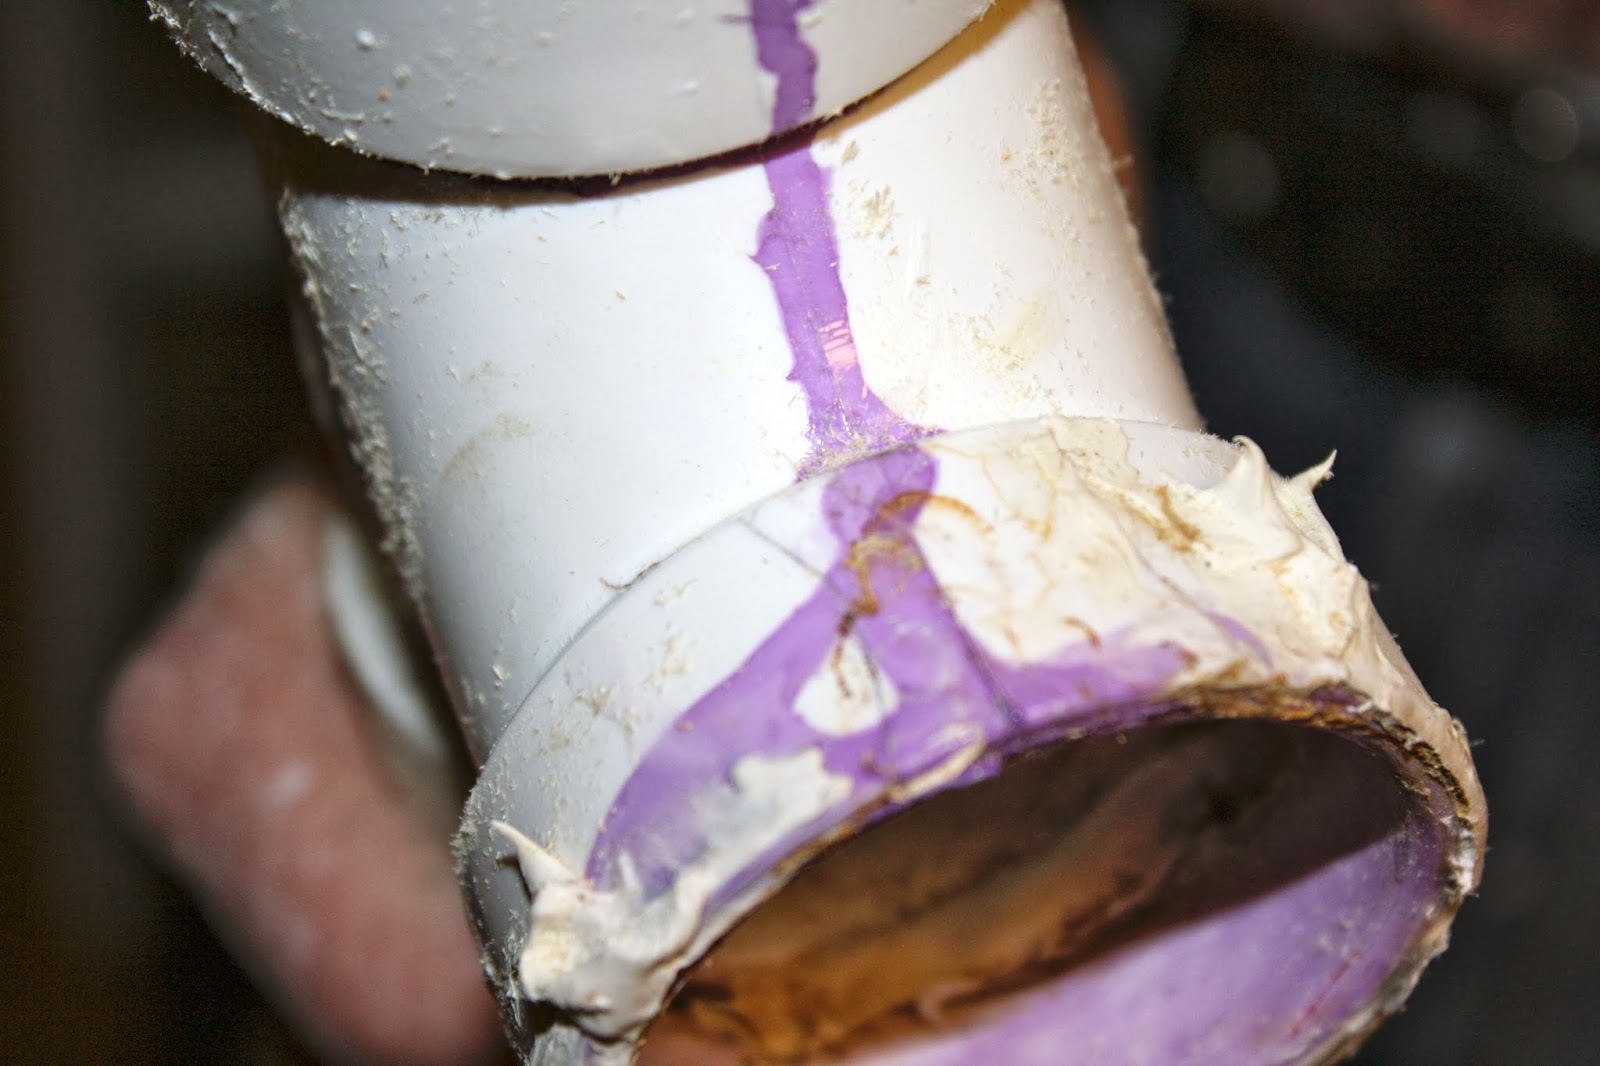
Not so excellent work. The problem was that the sanitary T was cracked on the bottom because they had left tension in the line. We had no choice but to take everything out and start over.

We used both a jigsaw and a hacksaw to remove the old pieces.
 
I forgot to take the picture, but this piece was replaced as well.

We did what we could away from the work space. To cut the pipes, we used the miter saw. This gave a super clean cut. To join the drain pipes, the pieces are primed using purple primer and then set using clear cement. You have about 30 seconds from the time you apply the cement until it bonds, so you have to work quickly. The steps are as follows.

1. Prime both the pipe and the joint with primer
2. Immediately, apply cement to both the pipe and joint
3. Press the pieces together. As you are pressing them together, make a quarter turn of one of the pieces
4. Hold the pieces together firmly for 30 seconds

Both the primer and cement are extremely flammable and smell horrible. We were working around both our furnace and the hot water heater, so we joined any pieces we could join outside of the work space. We also let things dry and air out a bit before moving on. I wore a face mask. It doesn't remove all the smell, but the fumes will get to you pretty quickly.

My dad joining an elbow and a coupler using a 1.5" section of pipe:


 Me joining an elbow and pipe:


We replaced everything, so here is the end result.

Notice the extra space behind the hot water heater.

Unfortunately, we had to keep the through-the-wall pipe setup. There just was no where else we could put it.

Last piece (for now). Once I know where the sink drain will go, I will finish up the trap.


Much better.

This was the offending piece. The black is the crack you can barely see.

Inside caulk in an attempt to fix it.

Despite all the photos, this didn't take us too long to do. We started at 1 with no materials and ended at 6. Plus we took a few breaks. Despite the annoyance of having to re-do work, it was a good experience as I now know how to do it and it is not nearly as scary as I thought it would be.

How about you? I'm guessing most of my readers did not do plumbing work over Thanksgiving. We also put up the Christmas decorations, so our house is looking a little more festive. I may or may not cover that in a post this year, as we haven't really changed things up too much from years past, but we'll see. Until next time.

Monday, November 25, 2013

Drywall repair and lessons learned

Hi friends! A lot has happened since I last gave a basement project update. I was actually going to write this post last night, but I was super tired and watching Once Upon a Time and eating Indian food on the couch with J was just so much more appealing.

I finally finished up the drywall downstairs. In engineering, post-project, we do something called Lessons Learned to detail all the things you did wrong and would fix in the future. This project is no exception. I'll detail what I did first and then cover what I would do differently if I were doing this project again.

So, first off, we left off last time here:


I quickly realized there was a problem on the left side. The outer-edge sloped in from the rest of the wall due to the spacer piece they had put by the edge. A 1/4" difference over 28" is no big deal so the drywall didn't look weird, but I had no span and the drywall would have definitely had a bump in it. In order to get around this issue, I decided to cut back more of the drywall. The back seam will be hidden by our upper cabinets. Of course, when I cut back there were no studs (unlike what you see in the picture). I ended up making "studs" to hang the drywall by taking 2 x 4 pieces and using my kreg jig to attach them to the support above. The studs cannot hold any real weight, but can easily support the piece of drywall.

I used my jigsaw for the drywall cuts. It made super clean cuts for me.

As you can see the new piece of drywall covers the uneven edge nicely. I used drywall screws to attach.

I used drywall tape for the seams. Looking back, I wish I hadn't because there are a few bumps in the finished product. They will mostly be covered, but they still irritate me.

Screwing in the top drywall pieces. A note of warning... ceiling work is a huge pain.


Ceiling drywall pieces in.

I used tape for the inside crease. Here, you can also see the corner bead I put in. Corner bead is used to make drywall corners. It comes in sheet metal, vinyl, and paper-backed. The metal is the least expensive, but, looking back, vinyl would have been way easier to work with. I used mostly nails to attach the corner bead. I was concerned about screws poking out.


I didn't cover this too much, but I used a piece of drywall to cover the small section over on the right side. Luckily it sat flush with the rest of the wall. I had already started spackling over the corner bead on the right side in this image.

The top piece of corner bead being installed.

To get nice smooth edges, everything takes at least 3 rounds of spackling and sanding. There are a few places I wish I had gone over a few more times, but you really just try to do the best you can. It gets super tiring after a while. I started with a 6" plastic putty knife and worked up to a 12" drywall taping knife. You will want the larger one to smooth everything over. What I learned from drywall work is don't expect perfection.


This is the point where I stopped with the spackling and sanding. I had used about a half a tub of joint compound. Also, I needed to get things cleaned up for Thanksgiving.

I used 1-2 coats of primer on everything and then used leftover paint for the outside walls. I plan on painting the inside a different color, but I won't do that prior to turkey day. Here are some finished product pictures. They seem to hide the imperfections. There are a few bumps in real life, but I can always patch things up again before I paint again (since I plan on doing so). The outside walls are done at this point.


I love the header being down. It makes the space seem so much more open. I am really glad I did it.

Lessons Learned.

1. Had I known that I was going to do this much drywall work, I would have ripped out all the drywall and put in fresh stuff at the start of the project. I would have been able to see better what was going on with the electrical and plumbing. I would have had a lot less work to get all the edges smooth. And I wouldn't have had to repair all that drywall at the start of this project. I didn't think ahead enough at the start of the project.

2. I should have taken the header down before tiling. I was having to protect the tile the entire time and it gave me less mobility.

3. I would have used the self-adhesive drywall tape. The plain drywall tape was hard for me to work with on my first project, and I would have done much better with the more expensive stuff.

4. Have I mentioned that everything takes more time than I anticipated? True story.

I hope you enjoyed and learned from my drywall experience. I would say the next post will be about the cabinets, but I don't think it's true. There are a few more steps of prep work before we get there. Plus, I don't expect the cabinets to arrive until early-mid December. Stick with me... we are almost there. :)